Sunday, December 28, 2014

Christmas Projects 2014

Now that Christmas is over, and all of the gifts have been passed out, I can safely post some of them on my blog now...lol. Unfortunately, I didn't get a picture of some of them, so I'll have to see if I can get them back from the recipients just long enough to take pictures so I can post them here.

One of my coworkers gave me some cookie cutters last year for Christmas, I told her, " I guess you'll be expecting Christmas cookies next year" she said, " I'm sure you'll be able to think of something creative to make with them," which got me to thinking, maybe I could make cookie cutter ornaments. I went on Pinterest, and went on a search for ideas, and I was able to find quite a few ideas. Next, since I didn't want to use the cookie cutters that were given to me for Christmas, I went on a hunt for a good deal on large amounts of cookie cutters. I found a few places online that sold them in bulk, but fortunately, before I purchased any, I found a whole bunch of them, marked way down, after Christmas at Michael's. I thought I hit the jackpot...lol! I was able to pick through them and choose the ones I thought would work the best. So, this summer, while I was on break, I worked on the ornaments. Here are some examples of some that I made. They were so much fun to make.


Next I have a picture of one of the stockings that I crocheted for one of the students in the class I work in. I also gave one to a couple other kids in the family. 


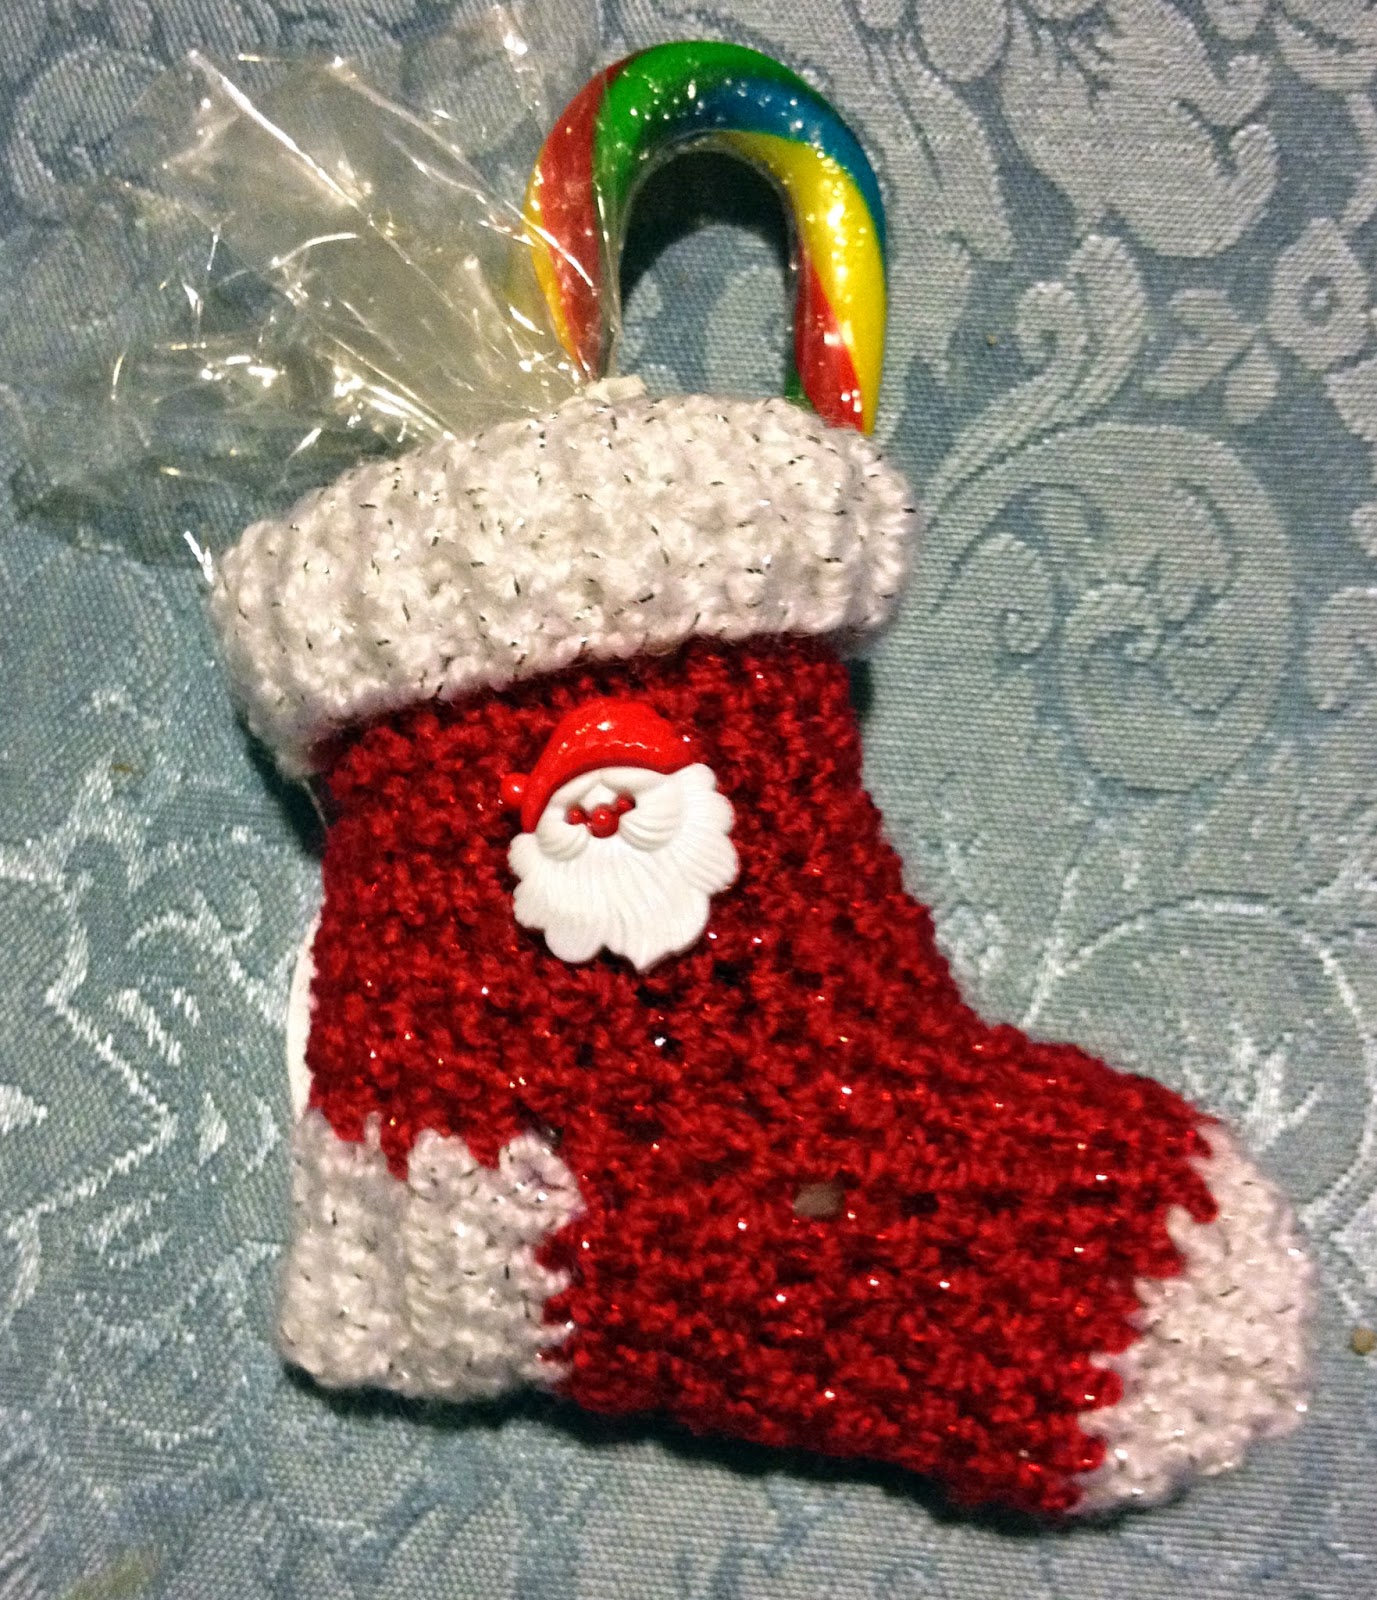
Inside the stockings I put red, green, and white gummy bears, and a candy cane. I really enjoyed making these stockings, they made for a good project to work on while watching TV in the evenings.
If you are interested in making one of these cute little stockings, I got the pattern on Etsy, at the ZoomYummy shop. 


LSH Secret Santa Swap 2014

There was another Secret Santa swap at A Lil Scrap Of Heaven, and yesterday morning I opened my door to a large padded envelope. I was on my way out to do some after Christmas shopping, so I had to wait til I got home. When I got home, I opened up the envelope, and found all this!


After being amazed at how many little packages there were, I started to open them up, one by one. I had so much fun, it was like Christmas morning. 


I just love doing Secret Santa, and my SS Marcia, sure did spoil me. I love everything I received, and I can't wait to put it all to good use. 

Tuesday, November 11, 2014

LSH Halloween Swaps

Hi everyone! It's been a while since I've last posted, so, I'm doing a little catch up here...lol! Recently I joined a Halloween treat bag, and tag swap at A Little Scrap Of Heaven. Here is the bag that I created for my partner.


The Bag:
I created my bag using a green lunch bag that I purchased at a local party store, added some patterned paper to the front and back of it, and a mat from the 6x6 Glitter Paper Pal Happy Haunting collection. This mat worked out perfect, because I wanted to add a Haunted house theme, and this gave me a background that was perfect for this. After adding the mat, I rummaged through my Halloween embellishment stash, and found the cute little haunted house, and all the extras from a variety of different packages. To finish it off, I added some lace on the top, and bottom of the design paper.

What's in the bag?
Inside the bag, I added this witch's boot that I made using a pattern from the Silhouette studio, and my Cameo. I added some embellishments that I had in my stash, then filled it with goodies. Some of the things I wanted to include in the bag wouldn't fit in the boot, so I just put them along the side in the bag.


The second swap for this month that I made was a Halloween tag for the "Twelve Tags of 2014" swap that is going on at LSH. 


I made the base of the tag from a tag template that I had. I used solid black for the back, and the polka dot patterned paper for the front. The Happy Halloween cat piece in the middle, is from a file from the Silhouette studio, Halloween Black Cat rocker card. I only used the front part of the card, then added a few little characters that I cut out of one of the papers from the paper pack that I got the mat from for my bag. I found that this paper pack had a lot of cute little things I could use for different projects. I found the "beware" sticker on the top in a collection of other stickers I had, and added a spider brad, and ribbon to the top. 

I sure hope my swap partners enjoy what I have made for them as much as I enjoyed making them.


Saturday, October 4, 2014

OWH World Card Making Day, Love Card Challenge


WCMD2014

Thanks for stopping by. Wow, it's really been a long time since I have blogged! With the holidays coming, and all the holiday creations that I will be making, I'm hoping to be able to find the time to get them blogged, so I can share them with you all. What a great way to start though, with a post for OWH for World Card Making Day. The theme for this one " Love".


On the card front, using my Silhouette die cutting machine,  I used one of the Heart Cluster Cards files from the Silhouette Design Studio. I laid the die cut piece on top of my 5.50" x 4.25" white card base, then with a stamp I had in my stash, and using a red ink pad, I lifted parts of it at a time, so I could get the stamped images under the heart cutouts. I then adhered the die cut piece to the base with dimensional foam tape.


Here is what I stamped on the inside of the card.

I really enjoyed making this card, and I sure hope the person that receives this card from the Hero that sends it, enjoys it just as much.

Friday, June 20, 2014

Mojo Monday #350

Summer vacation is well on it's way, and I am having lots of fun playing, with all the free time I have. I have decided to participate in this week's Mojo Monday sketch challenge. Here is the sketch for this week.


Here is my card that I made following the sketch.


I have decided I am going to try to use some of the stamps that I have collected and haven't used yet for some of the cards I will be making while I'm off. This is one that is in a collection of "Thank You" stamps. I really think it is a beautiful stamp, and I don't know why I haven't used it until now. I will be sending this card, along with others that I've made to Operation Write Home.

Tuesday, June 17, 2014

OWH Card Challenge 229

Hi everyone, thanks for stopping by. I decided to participate on the Operation Write Home, Stars and Stamps, sketch challenge for this week. This is the sketch being followed.

229

Here are my cards that I whipped up using this sketch.


I really liked this sketch, it was a lot of fun to work with. These cards will make wonderful additions to my box of cards that I am working on to send in my next shipment to OWH.

Saturday, May 24, 2014

Card A Day Blog Post: Birthday

Hi everyone, thanks for stopping by. Here's another post for the Card A Day Blog. This week's theme is, Birthday.


I started off with a 5.5" x 4.25" white card base. I then cut a piece of green card stock at 5.25" x 4" cut out a star with my Cuttlebug, and the next to the largest star die form the star Spellbinders set that I have, and embossed it with a star embossing folder. Before attaching this piece to my card, I traced the star on the white card base, so I could use it as a guide for my ribbon.


Before I added my ribbon, I ran my ATG gun around and across the star to ad adhesive for the ribbon to stick to, then I added ribbon, running it diagonally across the star tracing.


I then added a strip of ribbon along the bottom of the green star cardstock, then attached it over the ribbon with dimensional tape to lift it a bit above the card base. I stamped the words, Happy Birthday on a piece of white card stock, cut it to size, inked the edges with green ink, then added this piece to the middle of the ribbon.

I love this technique, I have used it a few times with different shapes. I hope you have the chance to let me know what you think of my card, by leaving me a comment, I always love to hear what everyone thinks of the things I make. Please be sure to stop by the Card A Day Blog, every day, and see what our designers have made for your card making inspiration. If challenges are your thing, you might want to check out our monthly challenge, for the chance to win a great prize!


Friday, May 23, 2014

Card A Day Blog Post: Father's Day

Hi everyone, it's time for another card for the Card A Day Blog. This week's theme is Father's Day. I decided to make a card that my grand son's can give to their father, my son.


To make my card, I started with a 5.5" x 4.25" white card stock base, and added the stars design paper from the Die Cut With A View, Rock Star stack, for my background, cut at 5.25" x 4". Then, on my Silhouette, and the Sure Cut's A Lot program, I created a file by using two overlapping diamonds sized to fit seven 1" squares in it, cut it out using white card stock, and adhered it to the top of the design paper. I then cut out 1" squares cut out of silver mirror paper, embossed them with the Diamond Plate, Cuttlebug embossing folder, then adhered them to the double diamonds. I got this idea from another blog I saw, but I can't find the blog again so I can give the original creator credit, but when I find it, I will be adding their blog to this post.

For my image, I used the motorcycle stamp from the Hot Off The Press, Small Stamps set, Motorcycle. I stamped the image using clear Versamark embossing pad, sprinkled black embossing powder in it, then heat embossed it using my heat gun. I then cut the image out, added dimensional tape to the back, then added it to the middle of the double diamond. For the wording in the corner, I used the " Born To Be Wild" stamp, also included in the stamp set, using the same embossing method as the motorcycle. On the inside, I will stamp " Happy Father's Day" using one of the stamps I have in my stash.

I hope my son likes this card, and I hope you did too. I would love to hear what you think, so if you have the chance, please leave me a comment. Please stop by The Card A Day Blog every day for some wonderful card making inspiration, and be sure to check out our monthly challenge, for the chance to win a great prize!

Sunday, May 11, 2014

Card A Day Blog Post: Use A Sketch


Hi everyone, this week's theme for the Card A Day Blog, is to use a sketch. I decided to get my sketch from Mojo Monday.


Here is the card I made using the sketch. I decided to make it a thank you card for my grandson's end of the year thank you gift to his teacher.


To make my card, I started off with a 5.5" x 4.25" white card base, for my main background paper, I used light blue card stock, embossed with the Swiss Dots Cuttlebug folder, then adhered it to the front of the card base.

For my bottom panel, I used Recollections Blue Quilt design paper, cut to 3" x 3", then matted it with a medium green card stock paper that would go well with the other patterns that I chose. I added that slightly to the left of my card front, according to the sketch. Next, for my second panel, I used Recollections Multicolored Dots design paper, cut to 4.5" x 2", and matted it with the same green cardstock that I used for my bottom layer, then adhered that piece, according to the sketch. For the strip on the left side of my first two layers, I used the same green cardstock, cut to .5" x 2.50", embossed it with the Swiss Dots embossing folder, and placed that piece according to the sketch.

For my sentiment piece, I cut out an oval using my Cuttlebug, and the Spellbinders oval die that would fit my sentiment best, in green card stock, then cut out another oval out of the next largest oval die, in the same light blue I used for the background paper. I stamped my sentiment on the green oval, inked the edges of both pieces, using ink that best matched each piece, then layered them on top of each other, using dimensional tape, then adhered this piece to my card, according to the sketch. I wanted to add a little accent to the sentiment piece, so I looked through my stash of Dazzles, and found a set that had a diamond patterned border that seemed to fit perfect.

I hope you like my card creation, and I hope you have the time to leave me a comment. Be sure to stop by the Card A Day Blog, every day, to see what our talented designers have made to share with us. Also, if challenges are your thing, you might want to check out our monthly challenge, for a chance to win a great prize!


Thursday, May 8, 2014

Card A Day Blog post: Thinking of You

Hello there, it's my turn again to post at the Card A Day Blog, and I have another "Thinking Of You" card for you to check out.


To start my card, I made a 5.5" x 4.25" white card base. For my background piece, I chose to use diagonal striped paper, so I cut out strips of  designer paper in 1/2 inch strips, then positioned them on a piece of white card stock, cut to 5.25" x 4", and when I got them placed the way I liked, I adhered them to the card stock piece.


I then flipped the whole piece over, and using the white card stock for a guide, I trimmed the edges of the designer paper even with the white card stock. After I got all the pieces trimmed off, I embossed this piece in my Cuttlebug, using the Swiss Dots embossing folder. I then added it to the front of my card base.

For my sentiment I stamped "Thinking Of You" on a piece of white card stock, cut it out then matted it in on a piece of red card stock, leaving some space on the ends so I could add a jewel dazzle on each side. I then adhered that piece to the middle of my card, diagonally.

I hope you enjoyed hearing how I created my card, I really liked the way it turned out. Please leave me a comment, and let me know what you think. Please be sure to stop by the Card A Day Blog each day for some great card making inspiration, and also, check out our monthly challenge, for the chance for a great prize!


Sunday, May 4, 2014

Card A Day Blog Post: Thinking Of You

Hi everyone, thanks for stopping by. It's time for another Card A Day Blog entry. This week's theme is, Thinking Of You.


I got the idea for my paper pieces from a post by J Rob, on the pineandpaper blog. For my card, I started off with a 5.5" x 4.25" white card base, then added a piece of patterned paper that I had in my stash, cut to, 5.25" x 4" to the top of the card base.

For my pedals, in dark purple card stock, I cut out two squares measuring 1.25" x 1.25" and four squares measuring .75" square each, I then cut the same in the lighter purple. On each of the pedals, I rounded the corners on the two of the diagonal corners.  I then positioned the large pedals, and the single small pedals on top of the patterned paper, keeping in mind where the rounded corners were placed, and when I got them how I wanted them, I adhered them to the card base. Then, with the remaining pedals, I added dimensional tape to the back, then placed them on the top of the larger pedals, placing them close to the inside corners of the the large pedals. For a little accent, I added silver Heart Jewel Dazzles to the smaller pedal layer.

For my sentiment, I stamped the sentiment, Thinking Of You, on a piece of white card stock, inked it with the same purple ink, then placed it on another light purple pedal that I had cut out, using dimensional tape, then added it to the lower left corner of my card.

I hope you enjoyed hearing about how I made my card, and I hope, if you have the chance, please leave me a comment, I'd love it. Be sure to stop by the Card A Day Blog, every day, to see what our designers are up to, and if you like challenges, please stop by and check out our monthly challenge, where we offer a great prize for that month's lucky winner!

Sunday, April 27, 2014

Card A Day Blog Post: Another Mother's Day Card

Hi there, it's time again for another entry for the Card A Day Blog. The theme is continuing with Mothers Day.


To make my card, I started off with a 5.5 x 4.25" white card base. I decided I wanted to use one of the trellis files that I have for my Cameo, and I wanted it inside a window, so I cut a piece of white card stock to 5.25 x 4", cut a window out in the middle of it with the second largest die from the Spellbinders die set, Romantic Rectangles, then embossed it with the Cuttlebug Swiss Dots folder. I then cut a piece of designer paper that I had in my stash, just a bit larger than the window, cut out the trellis with my Cameo out of green card stock, cut it to fit the designer paper, adhered it to the top of it, then adhered that piece to the underside of the window. I then inked the edges with green ink, then adhered the whole piece to my card base front.

For my accents, I cut out butterflies using the Martha Stewart butterfly stamp and punch set, but before I cut them out, I stamped the paper with one of the stamps that comes with the set with pink ink, then punched the butterfly out. To add a little sparkle, I added a little Crystal Stickles along the pink edges and in the middle, let them dry, then adhered them to the corners of the window.

For my sentiment, I typed out, Happy Mother's Day on my computer, in green, at the size I wanted, printed it out, then cut it down to size. To mat it, I used pink card stock, but I cut it so there was a little more on the edge of the right side, inked both pieces with pink ink, then adhered them together, leaving more of an edge on the right side. I added 3 green Jewel Dazzles along that edge.

I hope you enjoyed hearing about my card, I think this might be one of my favorites. If you have the chance, please leave me a comment, I really love to hear what others think. Be sure to stop by the Card A Day Blog, every day for some wonderful card making inspiration. Be sure to check out our monthly challenge, for the chance to win a great prize!


Sunday, April 20, 2014

Card A Day Blog Post: Mother's Day

Hi everyone, thanks for stopping by. It's that time again for another card for the Card A Day Blog. This week's theme is Mother's Day.


To make my card, I started off with a 5.5" x 4.25" white card base. I wanted to use some flowers that I had pre-made, using my Cameo, and I also wanted to use ribbon as well, so I went looking through my massive collection and found this polka dot ribbon, from Really Reasonable Ribbon, that I thought would work great for my project. I could not find this particular ribbon on their site at the time of this post, so I 'm not sure if they still carry it, but they do have some other wonderful ribbons that would work just as well.

For my background paper, I chose this purple card stock that I thought would go well with the ribbon and flowers, cut it to 5.25" x 4", ran it through my Cuttlebug, using the Swirl embossing folder, by Darice, cut a length of the ribbon to fit the piece, leaving a little more length to wrap around the edges, adhered it to my embossed card stock, then adhered that to the front of the card base.

I stamped the Mother's Day sentiment from Verve, using the Memento, Cottage Ivy ink pad, cut it to size, and matted it on a piece of light pink card, then attached it to my card. I then added the flowers that I had made from the Assorted Basic Flowers file, that I purchased from the Silhouette Studio store, with jewel Dazzles added to the middle.  

I hope you like my latest creation, and if you have the time, please leave me a comment, and let me know what you think. Be sure to stop by the Card A Day Blog every day and see what our designers have created each day to spark the creativity in you. Also, if you like a challenge, you'll be sure to want to check out our monthly challenge, for a chance to win a great prize!


Sunday, March 23, 2014

Card A Day Blog Post: Easter

Hi everyone, thanks for coming by. It's time for another post from me,  for the Card A Day Blog. This week's theme is, Easter.


To make my card, I first started off with a 5.5"x 4.25" white card base. For my background , I cut a piece of pink card stock, cut to 5.25" x 4", and embossed it with the swirl Cuttlebug folder, and my Cuddlebug, then adhered that piece to the front of my card base.

For my Easter egg, and the band behind it, I chose to use my new Silhouette Cameo that I just recently purchased. I decided to use a couple of the files I had purchased through their store, one of the Easter eggs from the Assorted Decorative Easter eggs set, and the Single Trellis background.

For the Easter egg, I chose my design, sized it to the size I wanted, and cut it out of a darker pink card stock, I then wove some trim that I had in my stash into the openings on the egg, then added a flat back pearl to the middle. To line the inside of the egg, I placed it on the design paper that I chose, so that one of the flowers showed on the top opening on the inside of the egg, traced around my cut egg, then cut around where I traced, I then glued both pieces together. 

For the trellis, I cut it out using a cream color card stock, fit to the size that would fit my card the way I wanted, added the same trim that I used on the egg, added flat back pearls, then adhered it to the middle of the embossed background paper. I then adhered the egg in the middle of the trellis.

I hope you like my latest creation, and if you have the time, please leave me a comment and let me know what you think. Be sure to stop by the Card A Day Blog, every day, and see what our designers have made to inspire you with. If you like to enter challenges, you'll want to check out our monthly challenge, for a chance to win a great prize! 

Sunday, March 2, 2014

Card A Day Blog Post: The Smallest Things

Hello again, it's time again for another Card A Day Blog post. This week's theme is, " Baby". Here is the card I created following the theme.


To make my card, I started off with a 5.5" x 4.25" white card base, then lined the front with a piece of designer paper from Hot Off the Press Paper Pizazz, Blue, Yellow, and Green paper pack, cut to 5" x 3.75", which was matted with a piece of solid green card stock, cut to 5.25" x 4".

For my center piece, I chose an image which was a digi stamp that I had that was created by Anne Bodil. I decided ahead of time which dies I wanted to use, and printed my image so that it would fit inside the die that I wanted to use, which was the next to the largest die from the Spellbinders Star Circle set, that I cut out using the same green card stock I matted my patterned paper with. 

After I printed my image on white card stock, I chose the colors I wanted to color it by using some of the colors I saw on the designer background paper. I chose to use, Copic Marker numbers, R11, RV21, G000, G14, YG41, Y000, Y02, Y08, E11, E21, and E50. I then cut out my image using one of the Spellbinder circle dies that best fit the image, but I found that it was a little too large for the star die, so I decided to cut a circle inside the cut star die using the next smallest circle that I used for the image. When I placed the image behind the star die, I found that some of the white card stock could be seen part way through the stars, so I had to trim around it just a bit, so it wouldn't show when placed behind it. I then cut out another Circle, using a die that was larger then the star die, using light yellow card stock, then adhered my image with the star die on top, using dimensional tape.

For my little banners at the bottom, I used the middle banner die from the Stamps Of Life, Sampler Dies set, cut from pink card stock, inked the edges with pink ink and a makeup applicator, then adhered them to the back of the bottom of the matted image, so that just enough of the top was tucked behind the piece so they would stick. I then adhered this whole piece to the center of my card. For a little sparkle accent, I added some of the littlest gold circle Jewel Dazzles to the wheels and handle of the buggy, and gold star Jewel Dazzles to the banners.

I hope you like this little card I made. I would really love to hear what you think. Be sure to stop by the Card A Day Blog every day for some wonderful card making ideas, and if you're into challenges, you might want to check out our monthly challenge, for a chance to win a great prize!

Sunday, February 16, 2014

Card A Day Blog Post: Wedding

Hello everyone, it's time for another Card A Day Blog Post. This week's theme is, Wedding.  Here is the card I made for the occasion.


To make my card, I started off with a 5.5" x 4.25" white card base. I looked through my stash of stamps, and came across this sentiment stamp that I thought would be great for a wedding card. I stamped it on a piece of white card stock, using my Memento, Red Rose, ink pad, then set it aside for later.

I wanted to make a window to put my sentiment in, so I looked through my collection of Spellbinders dies for something that would make and interesting cut out. I ended up using one of the dies from the Floral Doily Accent set. I thought it made a pretty frame, and was just the right size. I cut the shape out in the middle of a piece of white card stock, cut to 5.25" x 4", using my Cuddlebug, then embossed it with Darice's, Scrolls Background embossing folder. I inked the embossed scrolls with the same ink I used on my sentiment, using a makeup sponge. I also inked the edges, and the die cut section as well, which was no easy task...lol!

I added adhesive to my sentiment, then holding my embossed piece, I placed the sentiment where it would show through the window. I then added dimensional tape to the back of the embossed piece, and placed it on top of the card front, so that the sentiment showed through the window.

To finish off the card, I made a bow using my Bow Easy using a dark pink organza ribbon. I looped it around 3 times to make a bow that had three loops on each side. I placed a little pink heart metalic stud in the middle of the bow, then adhered it to the lower left corner of the window.

I really love how this card turned out, and I hope you did too. I think this one could not only be used for a wedding card, but for Valentine's Day, or a general  I love you card for any time of the year. I would really love to hear what you think, so if you have the chance, please leave me a comment.

Be sure to visit the Card A Day Blog each day and check out what our designers have for your card making inspiration, and if you're into challenges, you might want to check out our monthly challenge, where one lucky winner each month will win a great prize!

Sunday, February 2, 2014

Card A Day Blog Post: Invitations

Hi there, I'm here again with another entry for the Card A Day Blog. This week's theme is, Invitations. I already had this card made a while ago, but it was never finished, and I thought it would make a wonderful invitation to a BBQ.


To make my card, I first started off with a 5.5" x 4.25" white card base, then added a piece of patterned paper from " The Guy Stack" from Die Cuts With A View, cut to 5.25" x 4", to the front of the card base.

For my image, I used the digistamp, BBQ Alf, from Digistamp Boutique. I printed it out on white card stock at about 3.5" x 3.5", then cut around the edge. I colored the image with Copic Markers, but since I started this card some time ago, I can't remember the exact colors I used. I matted the image with a piece of green card stock cut just a bit larger than my image. I then adhered my image to the card base. For the message below the image, I used a " You are invited " stamp that I had in my stash, and matted that with brown card stock, and added that under the image.

On the inside, I printed out what the invitation was for, in this case, a Bar-B-Q, the date, time, location, and a space for other information.


I don't know about you, but I'm in the mood for some BBQ now myself...lol! I hope you get a chance to leave me a comment, so I know what you think about my card, I would truly appreciate it. Please stop by the Card A Day Blog every day to see what our designers have created to share with us, and also, if you're into challenges, you might want to check out our monthly challenges, for the chance to win a wonderful prize!


Sunday, January 26, 2014

Card A Day Blog Post: Thank You For Protecting Our Freedom

Hi everyone, thanks for stopping by. It's that time again for another Card A Day Blog entry. This week's theme is " Thank You". I chose to use a card that I made to send to Operation Write Home, for one of our brave heroes.


To make my card, I started off with a 5.5" x 4.25" white card base. I then added a background pattern paper from Hot Off The Press, Navy with Stars, cut to 5.25" x 4". I then made a panel using a white piece of card stock, cut to 4.25" x 3.25", matted it with a piece of red card stock cut half an inch larger going each way, stamped my sentiment on it, then adhered it to my star patterned paper.

For the striped paper panel, I used a piece of red, white, and blue striped paper, from Recollections, cut to 3.5" x 1.75", matted that piece with a piece of navy blue card stock, draped a piece of red, white and blue ribbon that I had in my stash, over the top right side, cutting it just a bit bellow the edge of my top panel, and cut a "V" at the end.

I hope the hero that receives this card, enjoys it as much as I enjoyed making it.

I would love to hear what you think of my latest creation, so if you have the time, please leave me a comment, and let me know what you think. Be sure to visit The Card A Day Blog, every day, for some wonderful card making inspiration.  Also, if you like challenges, you might want to check out our monthly challenge, where one lucky winner will win a wonderful prize.

Monday, January 13, 2014

Card A Day Blog Entry: Valentine's

Hi there, thanks for coming by. I'm here today with another card that I put together for the Card A Day Blog, for the theme, Valentine.


I started off my car with a white A2 card base, and added a background piece cut to 5.25" x 4" of designer paper. For the band going across the middle, I cut a piece of light pink card stock cut to 2.5" x 5.25, then attached a piece of the same designer paper that I used for the background, cut to 2 inches wide and the same length, then attached white ruffled ribbon that I purchased from Really Reasonable Ribbon. 

For my image, I cut and embossed a heart using the Spellbinders Die - De - Lites die, Swirled Heart, using burgundy card stock, then cut out the background piece with the same light pink paper I used for the center band. I glued the two pieces together, then added the heart to a piece of white card stock, cut to 3" x 3.25", that was embossed with the hearts embossing folder from Darice, inked the hearts with red ink, then adhered the heart to the top of that piece. I then attached all the layered pieces to the top of the band.  For a little added touch, I added Jewel Dazzle hearts to the ribbon and the heart.

I hope you like my newest creation, and that you give me a comment and let me know what you think. Be sure to check out the Card A Day Blog, every day for some great card making inspiration. Remember to check out our monthly challenge, where we will be awarding a prize to one lucky winner each month.  

Sunday, January 12, 2014

Sugar Cards Anniversary Giveaway !

Hi everyone! I'm making this post today to let everyone know about the Sugar Cards Anniversary Giveaway!


 Grace is celebrating her blogs 3rd anniversary, and she's giving away a wonderful bundle of blog candy to one lucky winner. So if you want a chance to win this fabulous prize, click on the image above, or on the icon to the right, and follow the instructions on how to enter.

Friday, January 10, 2014

OWH Sketch Challenge 206

For this post, I have made a card for the Operation Write Home sketch challenge #206, using this sketch that was provided to all the participants.

206

Here is the card that I made.


I decided to make it a birthday card, using some patterned paper I received in a swap, and a combination of Spellbinder dies. I also used an embossing folder and my Cuttlebug. I really like this sketch, and enjoyed following it. I will be adding this bright cheery card to my next shipment to OWH.

Mojo Monday Challenge 327

Today I have made a card for this week's sketch challenge at Mojo Monday. This is the sketch that they have posted for this week.


Here is the card I created using the sketch.


 I first started off with a white A2 card base, then added designer paper cut to 5.25" x 4", I then added a narrow red card stock panel that I embossed with a Darice heart embossing folder. I then made a panel from white card stock, that was embossed with the same heart embossing folder, inked the little hearts with red ink, then stamped and heat embossed the sentiment using the same method as the hearts. I matted this piece with burgundy card stock cut to just a bit larger.  I added some lace trim to the bottom of the embossed piece. The images I used and the sentiment was from the Inkadinkado stamp set, With All My Heart. I stamped the heart images on white card stock using Versamark, and burgundy embossing powder, then heat set them. I cut around them, then inked them with red ink, then placed them on my card. The two largest heats I used dimensional tape to raise them up a bit. For one last little touch, I decided to use a heart jewel Dazzle in the middle of one of the large heart.

I will be giving this card to one of my swap partners in one of the yahoo groups that I'm in. I hope she enjoys it as much as I enjoyed making it.

Sunday, January 5, 2014

Card A Day Blog Post: Valentine Bear

Hi everyone, here I am, with another post for the Card A Day Blog. This week's theme is, Valentine.


I made this card for Operation Write Home, and I already sent it on it's way to them about a week or so ago, so some of my measurements and colors might not be exact, but I will try the best that I can.

To start with, I used a 5.5" x 4.25" white card base. I then added a piece of heart pattered paper that I had in my stash, cut to 5.25"x 4" to the front of the card.

I decided to use this cute little Panda stamp from the Crafter's Companion, Party Paws, Love From Bamboo stamp set. Isn't he adorable? I got this stamp set with a voucher that I won for Crafter's Companion, when I entered to win a prize at Christina Griffith's blog, Card Making Magic

I stamped this little cutie on a piece of white card stock, then cut it down to approximately 2.75"x3.5". I colored the image with Copic Markers. I can't remember what colors I used, because, like I said, I made this card 2 or 3 weeks ago, and everything has been put away, but I do know I used 2 shades of red, and a very light pink for the heart, and a dark grey and black for the ears, paws, and feet. I matted my image onto a piece of pink card stock cut to approximately 3.5" x 4", leaving some space to the right of the image for the three little red heart Jewel Dazzles that I added. I them matted that piece to a piece of burgundy card stock cut a little larger than the top layer.  I adhered this piece to the top of the design paper that I added to the card base.

I hope you love this little guy as much as I do, and I would really love to hear what you think, so if you have the chance, please leave me a comment and let me know. Remember to stop by the Card A Day Blog each day to see what our designers have made to inspire you with. Be sure to check out our monthly challenge for the chance to win a wonderful prize!